Renewing or Replace a SSL Certificate in CRM
1. Remove (delete) the old cert using MMC on the CRM web servers & ADFS servers. Verify removal of the cert by reviewing your IIS https bindings. We found that if we did not remove the old one first, application of the new one would not work.
2. Add the new cert to the ADFS server first. Import new cert into MMC cert snapins console. Be sure your ‘AppPool user account’ has read permissions. You also need to be sure that the ‘ADFS service user account’ has full permissions to the cert. Bind new cert to https in IIS. From your cmd line, perform an IISreset.
3. Add the new cert to your CRM web application servers…all of them if there’s more than one. Import new cert into MMC cert snapins console. Be sure your ‘AppPool user account’ has read permissions. Bind new cert to https in IIS. From your cmd line, perform an IISreset.
4. On your ADFS server, update the cert in ADFS Mgmt Console. Under Service > certificates > Set service communications certificate to new cert.
5. Back again to your CRM web servers, fire up the ‘Configure Claims Wizard’, update to the new certificate, and apply.
6. On the ADFS server, in the ADFS Mgmt Console, under ‘Trust Relationships’, update relying trust federation metadata for all instances.
7. Test CRM…this worked for us.
How to change the AD FS 2.0 service communications certificate after it expires
Applies to: Windows Server 2008 DatacenterWindows Server 2008 Datacenter without Hyper-VWindows Server 2008 Enterprise More
PROBLEM
A user wants to know how to change the Active Directory Federation Services (AD FS) 2.0 service communications certificate after it expires or for other reasons.
SOLUTION
Replacing an existing AD FS 2.0 server service certificate is a multistep process.
=================================================================================
Step 1: Install the new certificate into the local computer certificate store
Install the new certificate into the local computer certificate store. To do this, follow these steps:
1. Click Start, and then click Run.
2. Type MMC.
3. On the File menu, click Add/Remove Snap-in.
4. In the Available snap-ins list, select Certificates, and then click Add. The Certificates Snap-in Wizard starts.
5. Select Computer account, and then click Next.
6. Select Local computer: (the computer this console is running on), and then click Finish.
7. Click OK.
8. Expand Console RootCertificates (Local Computer)PersonalCertificates.
9. Right-click Certificates, click All Tasks, and then click Import.
Add to the AD FS service account the permissions to access the private key of the new certificate. To do this, follow these steps:
1. With the local computer certificate store still open, select the certificate that was just imported.
2. Right-click the certificate, click All Tasks, and then click Manage Private Keys.
3. Add the account that is running the ADFS Service, and then give the account at least read permissions.
Note If you do not have the option to manage private keys, you may have to run the following command:
certutil -repairstore my *
Step 3: Bind the new certificate to the AD FS website by using IIS Manager
Bind the new certificate to the AD FS website by using IIS Manager. To do this, follow these steps:
1. Open the Internet Information Services (IIS) Manager snap-in.
2. Browse to Default Web Site.
3. Right-click Default Web Site, and then select Edit Bindings.
4. Select HTTPS, and then click Edit.
5. Select the correct certificate under the SSL certificate heading.
6. Click OK, and then click Close.
Step 4: Configure the AD FS Server service to use the new certificate
Configure the AD FS Server service to use the new certificate. To do this, follow these steps:
1. Open AD FS 2.0 Management.
2. Browse to AD FS 2.0ServiceCertificates.
3. Right-click Certificates, and then select Set Service Communications Certificate.
4. Select the new certificate from the certificate selection UI.
5. Click OK.
Note You may see a dialog box that contains the following message:
The certificate key length is less than 2048 bits. Certificates with key sizes less than 2048 bits might present a security risk and are not recommended. Do you want to continue?
After you read the message, click Yes. Another dialog box appears. It contains the following message:
Ensure that the private key for the chosen certificate is accessible to the service account for this Federation Service on each server in the farm.
This was already done in step 2. Click OK.
Introduction
Microsoft Dynamics CRM can be configured to use SSL (Secure Sockets Layer). For this to work, an SSL certificate is required.
Certificates can be purchased from certificate providers and will expire after a certain period of time. Once this time has elapsed, Microsoft Dynamics CRM will no longer work until the certificate is updated.
This article describes the process to update the certificate for Microsoft Dynamics CRM
Installing the new certificate
You will need to import your certificate into the local certificate store on each CRM server that uses web services, and the AD FS server if claims-based authentication is enabled.

Instructions on how to import a certificate can be obtained from your certificate provider.
· Symantec (Verisign, Thawte, GeoTrust)
· Go Daddy
· DigiCert
Note: Problems may occur if you do not remove the old certificate.
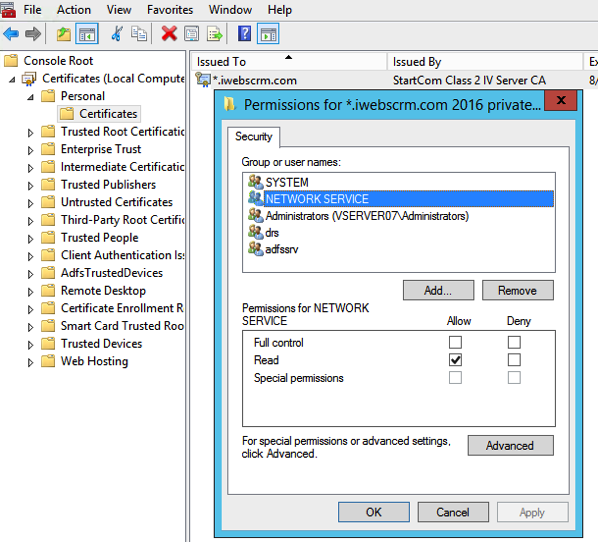
Add permission to the certificate
It is necessary to grant specific permissions to the certificate to allow service accounts access.

The following steps show how to add permissions to the certificate.
- Open the Certificate Console on the server.
- Check out the Microsoft Wiki for help
- Navigate to (Local Computer) > Personal > Certificates
- Right click the new certificate. Go to All Tasks > Manage Private Keys
- Add following permissions
· AD FS Server: CRMAppPool Account = “Read”
· AD FS Server: ADFSAppPool Account = “Full”
· CRM Server: CRMAppPool Account = “Read”
· In our case we were using the NETWORK SERVICE account and need to add the Read permissions
Update IIS (Internet Information Services) to use the new certificate
On the Microsoft Dynamics CRM website, the certificate bindings will need to be updated.

The following steps show how to bind the new certificate using IIS 8.
- Log on to the Microsoft Dynamics CRM Server.
- Open IIS.
- Locate the Microsoft Dynamics CRM website.
- Right click the website and click Edit Bindings.
- Select HTTPS and click Edit….
- Select the new certificate and click OK to save the settings.
- Close all open windows.
Reconfigure Claims-Based Authentication
The Microsoft Dynamics CRM application will need to be updated to use the new certificate.

The following steps show how to reconfigure claims-based authentication.
- Open Deployment Manager
- Click Configure Claims-Based Authentication to open the wizard
- Click Next on the Welcome page
- Click Next on the Token Service page
- Select the new certificate on the Select Certificate page
- Click Next to complete the configuration
Update AD FS (Active Directory Federation Services)
In AD FS, the Service Communication certificate will need to be updated.

The following steps show how to update the Service Communication certificate in AD FS 2.0.
- Open AD FS 2.0
- Navigate to AD FS 2.0 > Service > Certificates
- Click Set Service Communications Certificate
- Select the certificate and click OK
Update Relying Party Trusts
The Relying Party Trusts in the AD FS Management needs to be checked that the Relying Party Trusts are not showing an ! next to the listed Claims Relying Party Trust and the IFD Relying Party.
If they are, or even just to be safe. Click on each separately and the “Update from Federation Meta Data”

Once these have both been updated you can move onto the last task.
Final Tasks
To finish the process, all affected services will need to be restarted.

The following steps should be completed once the certificate has been updated. It may also be necessary to follow these steps if problems occur during any of the previous tasks.
· Perform an IISRESET on each server
· Restart the AD FS service on AD FS server
· Update Relying Party metadata
1. Open AD FS 2.0
2. Navigate to AD FS 2.0 > Trust Relationships > Relying Party Trusts
3. Right click each relying party and select Update from Federation Metadata
4. Click Update
Comments are closed